lundi 30 novembre 2009

Html Parse Tool - Display Html Code In Your Blog

Follow the link below to our instant html parse tool.This can be used to display html in your blog posts.Once you enter html the parsed code will be generated and that code when added to a post will be displayed as code not formed.This tool can also be used to parse AdSense code as it needs to be parsed before being added to templates.

Parse Tool Here

Libellés : ,

samedi 28 novembre 2009

How To Add A Contact Us Page To Your Blog

In this post i will show you how to create a 'Contact Us' Page for your blog.I have a 'contact me' link at the top of this blog and it leads to a page within this site were you can fill out a contact form.

These pages are a are way to let people contact you without providing you Email address on your blog.I think all bloggers should have a way for readers of their blog to contact them and it also looks more professional and trustworthy.

Click Here To See My Contact Page In A New Window / Tab

I will also show you how to have your contact page back dated so it wont show up on your blogs homepage or recent posts.

UPDATE : Blogger now allows you to add your contact page as a 'Static Page' Click Here for more details.

First Here's how to create your contact page:

1. Go to www.Emailmeform.com .Sign up for your Free account and follow the simple steps to create your 'Contact Us' Form.
(Once someone fills the form to contact you, you receive an email and can reply)

Create Contact Form For Blof

2. Once you have completed the steps to create your form you will be on this page:
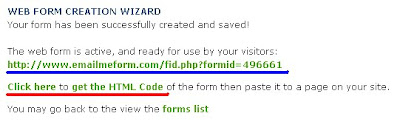

The link underlined in blue would lead to a pop up window with your contact form.

3. We are interested in the html code for your contact us form so click the link underlined in red to get the html code, you will get this page:


4. Copy the html code for the form.

UPDATE : You do not need to add your contact form as a post you can now add your contact page as a 'Static Page' Click Here for more details.

If you would still like to add the contact form as a post continue :

5. Now create a new post for your blog with the title 'Contact us' or 'Contact Me' and paste the code for your contact form into the posting area.

You can add some text etc... above the form as i did in my page.
Or other ways to contact you like fax or phone could be added to this page.
(Obviously be careful when providing information like this)

We Are Nearly Finished :
If you need more help or have an opinion or suggestion Please leave a comment Below.This is a Do-Follow Blog so leaving a comment will also help Your blogs Google rank.

Don't want the contact page on your home page / recent posts?

5. Below the post area click the 'post options' button:

blogger post options

6. Bottom right you see 'post date and time' set the date back a few months .
(I suggest setting the date back to around the time you started the blog)

Click publish post and your 'Contact Us' Page is ready.

Making a link to your Contact page

If you have a menu you could add it there.

If not you can add a link or button to your sidebar for people to click to contact you.

Click 'Layout' > 'Add a gadget' for your blog >Choose 'Html/Javeascript'

Now copy the code of the link or button below and pasted it into the area provided.

Option 1 a text link :

Preview :

Contact Us

Code:
Contact Us


Note: Change CONTACT-US-PAGE-URL-HERE to your contact me page URL.

Option 2 a button link:

Preview:


Code:


Note: Change CONTACT-US-PAGE-URL-HERE to your contact us page URL.

That's it have you added a contact page to your blog?

Libellés : ,

Add A New Random Post List Gadget To Your Blog

new random posts gadget blogThis post has been rewritten on 22-09-10 to include a new improved random post gadget.The previous gadget had stopped working.Thanks to Sylvia from Classical Bookworm for the heads up.

Most blogs have Recent Post and maybe Popular Posts gadgets in the sidebar and footer and these help keep readers on you blog and display some of  your best posts.But only the random posts gadget really digs deep into your archive and helps keep those old posts rotating.Adding the Random Posts Gadget will only take a minute so lets look at the steps.

Add A Random Posts Gadget To Your Blog

Step1. In your dashboard click 'Design' > 'Add A Gadget'

Step 2. Choose Html/Javascript Gadget and paste the following code into the area provided :

Best Blogger Tips

Note : You can change the number in red to choose how many posts you wist to have displayed.

Step 3. Give the gadget a title, Like : 'Random Posts', 'Posts From The Archive' etc.. Save The Gadget.


You have just added a cool new way for people to navigate your blog, make sure to check out some more great Blog Gadgets you will love !

Comments And Questions Welcomed Below.

Libellés : , ,

vendredi 27 novembre 2009

How To Add A Background Image Behind Your Blogger Posts

In this latest blog i will show you how to use an image in the background of your blog posts.This background image will only be behind the post area of your blog.

This is part 3 of 3 on adding background images to your blog recently i posted:

1.How To Use A Background Image For Your Blog

2.How To Add A Background Image To Your Blogger Sidebars

Be careful selecting an image to put behind your posts you don't want an image that makes your blog hard to read.You can find images on image hosting websites like Photobucket.


Once you choose your image here's how to add it to your blog:

1.Click 'Layout'-->'Edit html' For your blog

2.Find the following piece of code in your blogs html:
(Click'CTRL F' on your keyboard for a search box to help find code)

#main-wrapper {


You will see ' #main-wrapper { 'Followed by code similar to this :

#main-wrapper {
float: left;
width: 486px;
margin: 0px 0px 0px 0px;
padding: 0px 0px 0px 0px;
word-wrap: break-word; /* fix for long text breaking sidebar float in IE */
overflow: hidden; /* fix for long non-text content breaking IE sidebar float */
}

3.Now add the following code Directly Below ' #main-wrapper { '

background:url(PUT IMAGE URL HERE) repeat top right;
/* background-attachment: fixed; */


4.Replace the text 'PUT IMAGE URL HERE' above with the URL of your image.

We Are Nearly Finished :
If you need more help or have an opinion or suggestion Please leave a comment Below.This is a Do-Follow Blog.

Example:


#main-wrapper {
background:url(http://i941.photobucket.com/albums/ad259/spiceupyourblog/bloggerbackground.jpg) repeat top right;
/* background-attachment: fixed; */
float: left;
width: 486px;
margin: 0px 0px 0px 0px;
padding: 0px 0px 0px 0px;
word-wrap: break-word; /* fix for long text breaking sidebar float in IE */
overflow: hidden; /* fix for long non-text content breaking IE sidebar float */
}


Once you have added the code click save and your finished adding the image.

What do you think ?

Libellés : ,

jeudi 26 novembre 2009

Christmas Snow Falling Effect For Blogger Blogs

In this post we have a very cool effect you can use to Spice Up Your Blog over the Christmas.With just a small piece of code you have Snow Flakes gently falling down your blog.The Snow Fall effect we use is simple and wont disrupt the readers.Before you add the Snow to your blog you can check out the demo.

Update March 2014 - Since this post was published we have come a long way.This was so outdated we removed the script and added an Amazing New Snow Fall Effect For Blogger.

Also - 10 Spectacular Falling Christmas Objects For Blogger including a Falling animated Snowflake, snowman, Santa and Christmas Three check it out.

And. - Click to see how to get the snow effect with different colors.


With Christmas In Mind  Check Out How To Add A Fixed Floating 'Merry Christmas' Banner To Your Blog.We also have a cool tutorial with 3 types of flowers falling for your blog.More Christmas design for your blog ? We have a transparent Christmas Corner Banner

Drop Your Comments, Views And Questions Below.

Libellés : , ,

How To Add A Background Image To Your Blogger Sidebars

In this post i will show you how to use a background image behind your sidebars in your blogger blog.Adding the background image is very simple and just requires a small piece of code.

This is part 2 of 3 on adding background images to your blog recently i posted:

1. How To Use A Background Image For Your Blog

2. How To Add A Background Image Behind Your Blogger Posts

First you will have to select the image you want to use.

You can find images on image hosting sites like Photobucket.
The code is set to tile/repeat the image across the background so a small decorative image will do.

Once you choose the image here's how to add it:


1.Click 'Layout'--.'Edit Html' For your blog

2.Find the following piece of code in your blogs html
(Use 'CTRL F' for a search bar to find the code)


#sidebar-wrapper {


If you cant find that code it may be:


#side-wrapper {


You will see '#sidebar-wrapper'followed by code similar to this :


#side-wrapper {
float: left;
margin: 0px 0px 0px 0px;
padding: 0px 0px 0px 0px;
word-wrap: break-word; /* fix for long text breaking sidebar float in IE */
overflow: hidden; /* fix for long non-text content breaking IE sidebar float */
}


3. Now add the following piece of code Directly Below #side-wrapper {


background:url(PUT IMAGE URL HERE) repeat top right;
/* background-attachment: fixed; */


We Are Nearly Finished:
If you need more help or have an opinion or suggestion Please leave a comment Below.This is a Do-Follow Blog .

4.Replace the text 'PUT IMAGE URL HERE' above with the URL of your image.

Example:


#side-wrapper {
background:url(http://i941.photobucket.com/albums/ad259/spiceupyourblog/bloggerbackground.jpg) repeat top right;
/* background-attachment: fixed; */
float: left;
margin: 0px 0px 0px 0px;
padding: 0px 0px 0px 0px;
word-wrap: break-word; /* fix for long text breaking sidebar float in IE */
overflow: hidden; /* fix for long non-text content breaking IE sidebar float */
}

5.Now click save and your Background image is added to your blog.

Were you able to add an image ? Let me know how you did.

Libellés : ,

mercredi 25 novembre 2009

How To Add A Stacked Scrolling Recent Posts Widget To Your Blog

In this post i will show you how to add a stacked animated recent posts widget to your blog using Google Ajax feed API.The widget is easy to add to your blog and can be placed in your sidebars under/over posts or anywere you can add html/javescript gadgets.In a previous post i covered adding a single scrolling recent posts widget to your blog using the same format Click here for that post

Preview

Heres a screenshot of how the widget looks showing my recent posts :

Recent Posts Widget

Demo : Click Here To See A Working Demo Of The Widget

Get Your Stacked Recent Posts Gadget

Heres the steps to add the widget to your blog displaying your recent posts :

1.Click 'Layout'->'Edit html' for your blog

2.Click 'Add a gadget'
add a gadget blogger

3.Select 'html/javascript'

4.Paste the following code into the area provided:


Recent Posts Loading...


Now you must make the following changes to the code:

1.Were you see 'YOUR BLOG TITLE HERE' in the code above replace with your blog title

Example: Spice Up Your Blog

2.Were you see 'PUT YOUR FEEDBURNER URL HERE' in the code above replace the text with your feedburner URL.

Example: http://feeds2.feedburner.com/spiceupyourblog
(Don't have a feedburner feed? Click here to get one.Its a Google service only takes a few minutes.)

Once you Have made the changes click save and your done !

You can do much more with Google Ajax feed API Click here to go to the Google page.

Libellés : , ,

mardi 24 novembre 2009

How To Use A Background Image For Your Blog

In this post i will show you how to have an image as the background of your blog.Adding the image is easy and can be completed in a few steps.

This is part 1 of 3 on adding background images to your blog recently i posted:

1.How To Add A Background Image To Your Blogger Sidebars

2.How To Add A Background Image Behind Your Blogger Posts

First you must find the image you want as your background you can find images on image hosting sites like Photobucket of do a Google image search.

You can find/create an image big enough to cover the entire background of your blog.

Most people will just find a small image that will repeat across the background i have set the code to accommodate both.

How To Use A Background Image For Your Blog

Once you have your image here's how to add it :

1.Click 'Layout' -->'Edit Html' for your blog

2.Find the following piece of code in your blogs html:
(Click 'ctrl F' for a search box to find the code)


body {


You will see 'body {' followed by code similar to this:


body {
margin: 0px 0px 0px 0px;
padding: 0px 0px 0px 0px;
text-align: center;
color: $textColor;
font-family: arial,verdana,helvetica,tahoma,Sans-serif;
font-size: 100%;
width: 100%;
}


3.Add the following piece of code Directly Below body {


background:url(PUT IMAGE URL HERE) repeat top right;
/* background-attachment: fixed; */


4.Replace the text 'PUT IMAGE URL HERE' above with the URL of your image


We Are Nearly Finished - : If you need more help or have an opinion or suggestion Please leave a comment Below.This is a Do-Follow Blog.

Example:


body {
background:url(http://i941.photobucket.com/albums/ad259/spiceupyourblog/bloggerbackground.jpg) repeat top right;
/* background-attachment: fixed; */
margin: 0px 0px 0px 0px;
padding: 0px 0px 0px 0px;
text-align: center;
color: $textColor;
font-family: arial,verdana,helvetica,tahoma,Sans-serif;
font-size: 100%;
width: 100%;
}


5.Click Save and you have your background image added.

Have you added a background image to your blog ?

Libellés : ,

vendredi 20 novembre 2009

How to add a Related Posts list under your blog posts

In this post i will show you how to place a related posts widget under your blog posts.Displaying related posts under your blog posts is a great way to keep visitors to your blog - on your blog.The gadget works by displaying a list of posts that have the same label/labels as the post currently being viewed, so there is a good chance the visitors will also be interested in the related posts.To add the recent posts widget we must add two pieces of code to your blog.

How to add a related posts list under your blog posts

Adding Related Posts To Your Blog.

1. Click 'Layout'-->'Edit html' for your blog
(Tick the expand widget templates box)

2. Find the following piece of code in your blogs hmkl:


3. Copy and paste the code below Directly Before


We Are Nearly Finished - First A Quick Reminder:
If you need more help or have an opinion or suggestion Please leave a comment Below.
This is a Do-Follow Blog so leaving a comment will also help Your blogs Google rank.

Note: You can change the maximum amount of related posts listed its currently 6
Simply change this section above : max-results=6

Once you click save the related posts list has been added.What do you think ?

Libellés : ,

mardi 17 novembre 2009

Ten Free Visitor Hit Counters For Your Site

In this post i will list ten free visitor or hit counters you can add to your blog to keep track of how popular your blog is who is visiting etc...You can now keep track of so much information and in real time and most counters just need you to add a small piece of code.

Ten Free Visitor Hit Counters For Your Blog

Here's the stat counter list


  • Blogpatrol Who is reading your blog? What is your most popular content? How do visitors find your blog?


  • Statcounter Insert a simple piece of our code on your web page or blog and you will be able to analyse and monitor all the visitors to your website in real-time!


  • Free-counters Very original styles,Get a counter in one click!


  • Freebloghitcounter Looking for a quick and simple way to keep track of your web page visitors?


  • Statssheet Free Website Counters, Website Tools, & Articles


  • 24counter All types of counters for your blog


  • Website-hit-counters provide one of the most comprehensive selections of free, attractive and very reliable website hit counters


  • Shinystat ShinyStat ISP enables its partners to measure the traffic of numerous sites at the same time and to enjoy particularly advantageous resale conditions.


  • Freehitcount Selection of novelty counters


  • Totallyfreecounters Change colors and styles ot your counter


  • If you need more help or have an opinion or suggestion Please leave a comment Below.

    This is a list of i have found usefull there are lots more counters out there,be sure to explore all the options on the sites.

    Libellés : , , ,

    lundi 16 novembre 2009

    How To Add Gadgets Above Or Below The Header In Blogger

    In this post i will show you how to edit your blog to allow gadgets be placed above or below your blogs header section.This is great for adding Menu bars, adsense, search bars and moreIn most blogger templates you can add gadgets to your sidebars and under or over your posts but by default not below or above the header area.You can however make a quick change to your blogs html that will allow you to add gadgets below or above your blogs header.

    You can also add gadgets like adsense inside your header section Adsense In Header Blogger to see a post on this.

    Take a look at how i changed this sample blog to allow the gadgets :


    Blogger maxwidgets
    In this image you can see the gadget is not allowed below or above the header.


    Add gadgets above header blogger
    Now once the code is changed we can add gadgets above the header.....


    Add gadgets to header blogger
    And we can also add gadgets below the header.


    Heres how to make the changes :

    1.Click 'Layout'-->'Edit Html' for your blog

    2.Find the following piece of code in your blogs html :
    (use 'ctrl f' for a search bar to find the code)


    3.This is the section of code you will see under


    maxwidgets="1" showaddelement="no">


    All you have to do is change the 'Maxwidgets' from '1' as seen above to '5' as seen below :


    maxwidgets="5" showaddelement="no">


    We Are Nearly Finished:If you need more help or have an opinion or suggestion Please leave a comment Below.This is a Do-Follow Blog so leaving a comment will also help Your blogs Google rank.

    You could change it from 5 to as many as you want but its unlikely you would want to add more than five gadgets.

    You can also add a wide gadget across the entire width of your blog under the header check it out !

    Click save and your finished Gadgets can now be added above and below the header!

    What do you think ?

    Libellés : ,

    dimanche 15 novembre 2009

    Make A Recent Posts For Your Blog Via FeedBurner

    Feedburner Logo 3DIn this post i will show you how to make an Easy Stylish Recent Posts widget using Feedburner.This widget can be created in a few clicks and can be styled to your taste.

    All you need is a feedburner feed,Creating a Feedburner feed for your blog is a must if you don't have one click here to see how to get one.

    Feedburner even offer a one click button to add the widget to your Blogger or Typepad blog so you don't have to copy any code.

    Here's an Example of the widget using my feed :


    You can also edit : Number of posts to display, Author name, Lenght of description, Date, Feed link and more.

    Get Your Recent Posts Gadget
    1.Log into your Feedburner account and select your blog feed.

    2.Click 'Publicize' in the top menu.

    3.Click 'Buzz Boost' in the side menu

    4.Edit the look of your widget - Number of posts, Title etc...

    5.Now use the one click option to add widget to your blog OR Copy the widget code available.

    Job done.

    Drop Your Comments And Questions Below.

    Libellés : ,

    jeudi 12 novembre 2009

    How To Add SEO Meta Tags And Description To Blogger

    How To Improve Your Blogs Google Rank With Mata Tags & DiscriptionIn this post i will show you how to add Meta Tags And Meta Description to your blog.Improving your search engine rank is key to the success of your blog.This is known as S.E.O. (Search Engine Optimization).

    Large companies spend a fortune on S.E.O. ,That's great if you have a fortune to spend ! Search engines use automated spiders and crawlers, to collect information from your blog.They collect URL'S ,Titles,etc...
    They also collect keywords from the early parts of your blog posts.

    However you don't know which words are taken as keywords connected to your blog, It's likely the keywords been taken are not relevent to your blog at all. In this case your blog won't be indexed properly in search engines.

    Theres also a chance your highly relevant keywords might not even be used to index your blog.This will result in your blog being ranked behind Thousands of others in searches !

    But you can take control !

    You can add Meta Tags and Description to your blog.

    Now YOUR telling the search engine spiders and crawlers the key words and description YOU want your blog to be indexed under.

    So lets do it !

    First you must copy the code below and add a meta description and meta keywords (as shown in bold) as follows:


    Heres an example of how the code might look for this blog:


    Notes on Description:'PUT BLOG DISCRIPTION HERE'.- TRY KEEP IT LESS THAN 150 CHARACTERS

    This explains its self,Keeping it under 150 characters is search engine friendly,you don't have to use 150 characters it can be as short or long as you wish once its relevant to your blog.

    Notes on Keywords :'PUT, KEYWORDS, HERE, SEPERATED, BY, COMMA,'-YOU CAN ADD AS MANY AS YOU LIKE - SEPARATE BY COMMAS - DON'T USE THE SAME WORD MORE THAN 5 TIMES

    -Think which words or phrases best describe your blog.Repeating a word more than 5 times can be seen as spam by search engines.

    Adding The Code To Your Blog :

    1.Click 'Design'-->'Edit Html' For your blog.

    2.Find the following piece of code in your blogs html:
    (Its very close to the top)


    3.Add the meta content code Directly Below

    4.Click save and your finished.

    In a previous blog i covered Improving S.E.O. by Changing the way Google sees your blog this is also important: Improved Blogger Title Format.Check out more of our SEO Tips

    Drop Your Comments And Questions Below

    Libellés : , , ,

    mercredi 11 novembre 2009

    Five Types Of Google Translate Widgets For Your Blog

    In this post i will show you five different types of Google translate widgets and how to add them to your blog.The blogosphere is a Global phenomenon so its important to make your blog available in all languages.Below i will cover how to Add the translate widget code to your blog.First here's the five types of Translate widgets with the code needed:

    Translate Gadgets

    How to add a Google Translate widget to your blog

    1.Small Drop Down Menu:

    Small drop down translate menu

    Small Drop Down Menu Code:


    2.Single Column With Flags:

    How to add a Google Translate widget to your blog

    Single Column Code:


    Single Column code With Transparent Background :


    Single Row With Flags

    How to add a Google Translate widget to your blog

    Single Row Code:


    Double Row With Flags

    How to add a Google Translate widget to your blog

    Double Row Code:


  • How To Add the code to your blog


  • We Are Nearly Finished - First A Quick Reminder:
    If you need more help or have an opinion or suggestion Please leave a comment Below.It also really helps me to get feedback.
    This is a Do-Follow Blog so leaving a comment will also help Your blogs Google rank.
    OK Back to business....

    1.Choose a widget above and copy the code

    2.Click 'Layout'-->'Add a gadget' for your blog

    3.Choose html/javascript in the pop up window

    4.Paste the code into the area provided

    5.Click save.

    Your Google Tanslate widget has been added.

    Libellés : , , ,